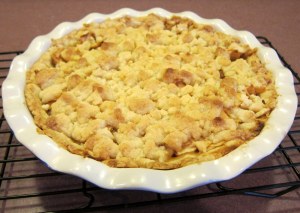
One Bowl Apple Crumble Pie and Dairy/Soy Free Pie Crust

IMG_6630

Thanksgiving isn’t complete without a dessert.  Although I often am nervous about bringing my dairy free creations to family gatherings, I know one family dinner guest list includes several people who avoid dairy so I will be bringing a dairy-soy free apple pie.

I made this apple pie a few weeks back for my husband and kids after we went to the apple orchard.  It was a big hit.  Although I prefer to share recipes that don’t need expensive substitutes/butter replacers, this recipe definitely needs one for the crumble topping.  The good news is you can make a very decent pie crust with things you probably have around the house.

In the past I’ve made pie crusts by substituting the butter in recipes with Spectrum shortening or Earth Balance Soy Free Spread.  These came out fine but I have another crust recipe that bypasses the expensive ingredients, chilling time in the fridge and extra mess.   I make an oil based crust that you don’t have to roll out, but it will still hold a shaped edge for pretty pies.  I use canola oil for sweet pies and a light olive oil for savory applications like a quiche crust.  I make my crust with half whole-wheat pastry flour for the nutritional benefits and the nutty taste, but all-purpose flour will probably be fine if you don’t have that.  I want to note that I cannot find the original source for this recipe to give credit where it is due. I jotted an oil crust recipe down next to a pie filling recipe some time ago and tinkered with it a bit.  Like many things, I get inspiration somewhere and often adapt it to fit allergy needs and my family’s taste buds.  So thanks to whoever originally came up with this idea!

The apple pie recipe comes from a recipe I found on allrecipes.com. I tweaked both the ingredients and construction a bit to fit my diet and make it a one bowl deal.  That is one bowl, including the making of the pie crust.  Yay! (I’m always looking for a way to use less dishes.)  To make the apple filling for the pie I like to use an apple-corer-peeler-slicer to speed up the process but you can definitely do it by hand if you have to or wish to have chunkier apple pieces.  Just make sure you adjust your baking time to compensate for the larger pieces of apple.    To test for doneness I often sneak a piece of apple out of the pie edge and see if it is cooked through.  If you see thickly bubbling juices, that is another good sign.   If the top of the pie is getting too brown and the apples need more time to cook, just throw a piece of foil over the top of the pie while it continues to cook.  Be sure to cool your pie completely before slicing.

Here is the pie crust recipe by itself if you just want to use the crust, but see the apple pie recipe below for how to make the pie crust and pie using just one bowl.

Easy Dairy and Soy Free Pie Crust

2/3 cup canola oil (or other neutral tasting oil)

2 teaspoon sugar

1 teaspoon salt

6 tablespoons water

1/8 teaspoon butter flavor (very optional)

1 cup all-purpose flour

1 cup whole wheat pastry flour (or all-purpose flour)

Directions

Mix the oil, sugar, salt, water and butter flavoring, if using, together in a large bowl.  Add in the flours and stir until combined. Press dough directly into pan.

One Bowl Apple Crumble Pie

Ingredients for easy pie crust (see above)

5 cups apples peeled cored and thinly sliced

1/4 cup white sugar

1/4 cup brown sugar

3/4 teaspoon ground cinnamon

2 teaspoons arrowroot starch  (or cornstarch)

Topping Ingredients:

1/3 cup white sugar

3/4 cup all purpose flour

6 tablespoons butter replacer like Earth Balance Soy Free Spread

Directions

In a large bowl combine the ingredients for the Easy Pie Crust.  Press the dough into a pie pan.  Preheat oven to 400 degrees F.  In the same bowl used for the crust (don’t bother washing it), mix apples, 1/4 cup white sugar, 1/4 cup brown sugar, cinnamon and arrowroot starch.  When the apples are evenly coated, spread the apples evenly in the unbaked pie crust.  Now prepare the topping in the bowl (no, don’t clean it yet.)   Mix the 1/3 cup sugar with the 3/4 cup flour.  Add the butter replacer and stir/mash it with a fork until the mixture is crumbly. Top the pie with the mixture- I use a measuring cup to scoop it up and distribute over the apples.   Bake pie for 35 -40 minutes or until the apples are soft.  (I often sneak an apple piece out, cool it slightly and eat it to see if the apples are soft).  Baking time will vary depending on how thinly the apples were sliced.  Cool completely before cutting!

Please forgive the mediocre picture. WordPress mangled/lost this  post twice. Running short on time to get this up before turkey day.

Thanksgiving Food Plan

Thanksgiving is right around the corner and I wanted to share how I approach this food centered holiday.  I usually end up doing a lot of cooking, making myself a mini-Thanksgiving, but since my family has two turkey celebrations to attend and I love leftovers, having a lot of food is a good thing.  Going to big gatherings full of delicious butter laden food can be hard when you are on an allergy diet so have a plan, bring yourself something delicious to eat so you don’t feel deprived and enjoy the holiday!

My Dairy-Soy Free Thanksgiving Plan:

1.    Inquire about safe items in advance:  I check with my family to see how some things are prepared.

–  I can usually eat turkey and cranberry sauce.  I make sure the turkey wasn’t injected with things or covered in butter for cooking.

–  I don’t ask people to change recipes for me but since it is family, I don’t mind asking for a few little favors.  I have my mom put some of the boiled potatoes to the side that I will mash with some chicken stock when I get there.   She often will leave a cooked vegetable like green beans in a dish for me to season myself.

(I do want to note that my family has been awesome at trying new recipes to accommodate this crazy diet so there is more I can eat at family gatherings.  Very very grateful for their patience and kindness!)

2.   Bring safe side dishes:    People seem to be uncomfortable if I have little on my plate plus it is nice to have a balanced meal.   Some dishes I bring to share and some are just small butter free versions of the usual fare that I bring to add to my plate.  Here are a few ideas:

– Potatoes mashed with some butter replacer and chicken stock or just chicken stock

– This amazing butternut squash recipe from Ina Garten.  Super easy and delicious. Definitely one I’m bringing to share.

– Sweet Potatoes mashed with cinnamon, honey and either butter replacer or vegetable stock.

-Bread/Rolls –  Last year I made a rosemary loaf a day or two ahead to bring and share.

-Salad – My favorite salad is this apple cranberry salad  (go easy on the onion) but recently I experimented with a fall salad of romaine, apples, cranberries, pecans and an apple cider vinaigrette which was tasty.

-Last year when I could still eat one brand of store-bought bread, I made stuffing by sautéing onion and celery in olive oil, seasoning pieces of bread with poultry seasoning, salt and pepper and using a blend of chicken stock and eggs as the binder/moisture.  I baked it in the oven until it was 160 degrees (so the eggs were cooked).  Pretty tasty.

3.  Bring a lively libation  – If you can’t have all the fun foods, sometimes it is nice to have something fun to drink.  Wine, cocktails, mocktails or just something you don’t normally let yourself have.   Sparkling juices are a favorite of mine this time of the year.

–   Try our family favorite:  Cranberry Spritzer :  Place ice in a glass, pour cranberry juice in about 2/3 way up, add a few good splashes of tonic or 7-up, squeeze in several wedges of lime, place limes in the glass and stir gently.  I like tonic because it adds more limey flavor and is bubblier but 7-up makes it sweeter.

4.    Don’t Forget Dessert:

– Last year I brought a homemade Lemon Chiffon Cake (I made some notes here)

–  I’ve also made Dairy-Soy Free Pumpkin Pie – I use a canola oil crust recipe (will try to get this up this week)  and make the pumpkin pie according to these directions except I replace the evaporated milk with evaporated rice milk that I made:   Pour double the amount of milk you need in a saucepan and boil it down. So start with 24 ounces of rice milk and boil until you have 12 ounces. Cool and use in your recipe

–   This year I am bringing Apple Crumble Pie.  I am trying to get this one written up to share this week.

– Pie sidekicks – I am going to try making my coconut whipped cream  and add some cinnamon or pumpkin pie spice to jazz it up or I might try to get ahold of something called Healthy Top. If you’ve tried this whipped cream substitute I’d love to hear from you.   Recently I also  made some coconut milk ice cream and added lots of cinnamon to the batter before churning/freezing.  I think that will go really well with pie.

I hope everyone has a safe and happy Thanksgiving!!

The Secret To Better Frosting

I just have a moment to write while my kiddos finish up their naps, but I wanted to get this out before you start planning your holiday goodies and shopping lists.    I discovered the secret to making better frosting- dairy or dairy free:  Powdered Sugar that is 100% cane sugar.   No beet sugar!  This may be known to a lot of you already but it was a HUGE revelation for me.

In the past year I’ve made a lot of different dairy free frostings trying to find something similar to buttercream icing.  The results of these frosting experiments haven’t always been super smooth and I chalked it up to using various butter substitutes.  I figured the new ingredients were messing up the texture and accepted it for what it was.  More recently though I thought the frosting was even more grainy than normal.  I googled it and found a post somewhere explaining that grainy frosting is usually due to cheap powdered sugar that has been made with beet sugar instead of cane sugar.   I jumped up and looked at the generic powdered sugar that I have always used.  It just said sugar and cornstarch.  I looked at the bag of the brand name powdered sugar when I went to the store and it said “Pure Cane Sugar- No Beet Sugar.”  (So I guess the sugar people already knew it made a difference).

I made some frosting with the new 100% cane sugar powdered sugar and oh my goodness!  It was sooo smooth, like whipped cream compared to the stuff I’d been eating.  I had no idea the difference it could make!  It makes the dairy free frosting recipe I use SOO much better.   I couldn’t stop eating it out of the bowl.  I will NEVER buy the generic kind again for using in a recipe!


Soy Trial

Right after Colin’s first birthday we decided to do a soy trial, through my breastmilk, to see if Colin’s allergy was still present.  Both his doctor and allergist said he may have outgrown it and we too wondered if the bulk of our food challenges could possibly be unnecessary.  I hadn’t had eaten any soy since Colin was less than two months old.

I began on a Sunday afternoon, drinking soy milk.  The first few days I enjoyed some wonderful decaf lattes with soy milk and we ate a meal with soy sauce in it.  I also ate some bread containing soybean oil and soy lecithin.   Yes, I went all out.  I figured if I had a shot at soy I was going to make the most of the opportunity.  Also,with all that soy, it would probably be very clear whether or not it was a problem for Colin. Since Colin usually reacts 1-3 days after I ingest something, we figured by Wednesday night that we would see if it was still an allergy.  Wednesday went fine.  Thursday went fine.  I started getting very very excited and started making mental lists of all the things I was going to eat.  Friday he had a poo that was normal for a baby and we declared victory!  I think I even texted some people our good news.  This was huge!  But then… Saturday came.

Colin was super crabby on Saturday and not himself.  Saturday night he had diarrhea all night long.  For the next 4-5 days it continued every time I fed him.  I kept monitoring him for dehydration and feeding him whenever he looked interested.  Breastfeeding kept the dehydration at bay but his diapers got worse.  I won’t go into anymore details but it was exactly like when he was an infant.  I was really scared we were going to start seeing blood again.  Thankfully it didn’t get that far.

Colin continued having the intestinal distress for over two weeks.  He wasn’t a happy guy and I wasn’t a happy mommy.  Having to change a baby is hard enough, changing a feisty 1-year-old whole can flip and roll like an angry crocodile is a whole different ballgame.  Getting up several times night for a clean diaper meant Colin and I were more sleep deprived than usual.  I was so relieved when things finally settled down.  Colin started to feel better and my happy little guy reappeared.

So obviously soy is out. Really out.  Looking back at the trial I don’t know if it took Colin longer to react to soy than other foods or if what seemed to be a delayed response had something to do with the level of soy protein in my body or his body reaching some level.  I know other moms have said that they often see reactions in their children upon repeated exposures to a problem food, that it seems to take time to build up in their body before a reaction appears.  In the future I will trial other foods for longer than 4-5 days before declaring them a pass.  We won’t try soy for another year I would guess.  By then Colin will most certainly be weaned but we won’t feed him anything with any kind of soy in it for a long time.

If you’ve ever had experience with delayed reactions, building reactions or reactions that happened after repeated exposures to a food I’ve love to hear about it!

Tomato Caper Spread

Eating dairy/soy/whatever-else free is really tough when it comes to parties or get togethers with friends.  We tend to gather around food so coming up with a list of appetizers and snacks has been really important to me.  I try to bring one or more “safe” items so there is something I can munch on, but I also want it to be something everyone else will enjoy.  One of the positives to this ongoing food challenge is that I’ve found some great new recipes that have been big hits in our house and at parties.   One of my favorites is Tomato Caper Spread.

The inspiration for this appetizer was actually from an Anthony Bourdain show.  I don’t remember where he was, but someone on the show with him made this dip, causally throwing things into a food processor and the end result blew Anthony Bourdain’s mind.  When I realized there was no dairy in dip, I quickly wrote down the basic ingredients: bread, garlic, red wine vinegar, tomato paste and capers.  I tucked it away in my recipe files to experiment with later.

One afternoon before I was supposed to have people over for dinner, I pulled the notes out and decided to see what I could come up with.  I literally threw all the ingredients I’d seen in the show in the food processor and whipped it up.  The resulting dip/spread was fantastic and unique. I’ve made it over and over and even though it changes a bit each time, it is alway delicious.  The bread in the recipe gives the dip some body. The red wine vinegar, capers, garlic and tomato are the big flavors with emphasis on the garlic and tomato. The olive oil smooths it out and makes it spreadable or dipable.

Every time I make this and take it somewhere, at least one person asks me for the recipe.  Coming up with a “recipe” has been tough because I make it a little different every time and add things to taste.  I vary the bread I use in it, usually any safe bread I can find.  I’ve used pitas, french bread, challah bread, and often whole wheat bagels I had stashed in the freezer.  I also vary the amount of garlic I use.  The garlic flavor seems to intensify after sitting a few minutes and the flavors have a chance to mingle a bit.  I usually start with one medium clove of garlic and if its needs more I use a sprinkle of garlic powder instead of throwing in a whole other clove.  Don’t be afraid to experiment with the ingredients.

I serve the dip with some type of bread or cracker.  My favorites are crostini- little slices of bread, brushed with olive oil and toasted on each side in the oven, or pita bread cut into triangles and baked until slightly crunchy.  In a pinch I use Back to Nature whole wheat crackers.

Tomato Caper Spread

Ingredients

About 1 cup of safe bread, torn into large chunks

2 tablespoons red wine vinegar

1 medium clove of garlic

1/2 tube of tomato paste

2 tablespoons capers

Olive Oil

Salt and pepper to taste

Garlic Powder -optional -to taste

Directions

Place the chunks of bread in the bowl of a food processor and sprinkle with the red wine vinegar.  Then add the garlic clove, tomato paste, and capers.  Pulse the food processor 5 times and then continue to process until all the ingredients are combined. Stop and scrape down the sides as needed.  Slowly add olive oil through the feed tube/hole in the top of the food processor until the dip becomes a smooth spreadable consistency.  The amount needed will vary depending on the type of bread used so just stop and check the dip.  (Try spreading it on a cracker.  If it is crumbly and difficult to spread, continue to process and add more oil.)  Add salt and pepper to taste.  Let sit 5 minutes.  Taste and season with extra garlic if desired.

Serve with toasted pieces of bread, toasted pita wedges or crackers.